

DukItan Guide
How to organize receipts and warranties in Remember
A complete guide to recording purchases, attaching receipts, and tracking warranty deadlines with Remember's current features.
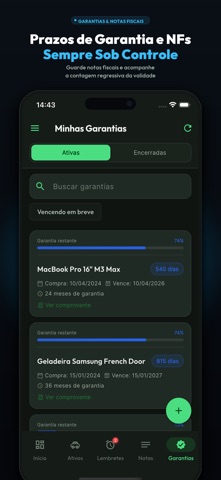
Keeping a photo of a receipt solves only part of the problem. When you need warranty support, you still have to remember which file belongs to the product, when coverage ends, and where the purchase details are stored. Remember’s Warranties module combines that information in a searchable record and keeps the receipt connected to the correct item.
This guide follows the current Remember interface from preparing a document to registering a purchase, monitoring its deadline, and retrieving proof of purchase when support asks for it.
How the Warranties module is organized
The Warranties destination in Remember’s bottom navigation opens a dedicated list separate from quick notes. The current screen provides:
- Active and Expired tabs;
- search by product name;
- an Expiring soon filter;
- a visual percentage-remaining indicator;
- the number of days until expiration;
- purchase date and warranty duration;
- a View receipt shortcut;
- a
+button for registering another item.
This structure answers the two questions that matter most: “which warranty needs attention now?” and “where is the document that proves this purchase?”.
1. Prepare the receipt before creating the record
Open the document and confirm that the store name, date, item description, amount, and access key are readable. If the purchase includes multiple pages or a separate warranty certificate, keep those files together.
When photographing a paper receipt:
- place it on a flat, contrasting surface;
- prevent shadows from covering dates and amounts;
- include all document edges;
- zoom in and check readability before saving;
- preserve the original whenever the supplier requires it.
Remember lets you photograph or attach proof of purchase. The image stays associated with the warranty record instead of becoming another unidentified photo in your gallery.
2. Register the warranty with the + button
In Warranties, tap the green + button. Use a name that identifies the product without opening it, preferably including the brand and model. MacBook Pro 16 M3 Max, for example, is more useful than Laptop.
Enter purchase information directly from the receipt. The purchase date and coverage period provided by the manufacturer or seller determine the deadline Remember will track. Add the serial number or another useful identifier when it is relevant to support.
Attach the receipt during the same process. Completing both tasks together reduces the chance of creating a warranty without documentation or linking a receipt to the wrong product.
3. Understand the deadline shown in the list
Every active-warranty card shows a progress bar and a remaining-day count:
- the day count communicates urgency;
- the bar makes several items easy to compare.
The Expiring soon filter narrows the list to records that need attention. Instead of checking every product, you can focus on coverage approaching its final date.
The displayed deadline depends on the data you entered. Update the record after a coverage extension, product replacement, or purchase-date correction so the countdown remains consistent with the supporting documents.
4. Monitor coverage before a defect appears
The best time to organize a warranty is while the product still works. Set alerts early enough to:
- test functions you use less often;
- check intermittent failures or unusual wear;
- gather accessories and serial numbers;
- review coverage conditions;
- contact the store or manufacturer before the deadline.
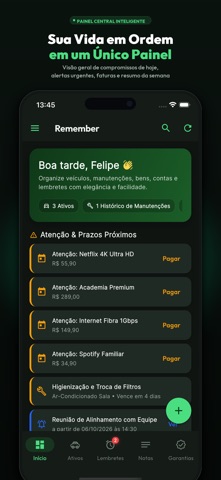
Remember brings deadlines and alerts into its central dashboard alongside other commitments. A warranty becomes an active item to monitor instead of a forgotten file.
5. Retrieve the receipt during support
When you need assistance, search for the product name and open the correct record. View receipt avoids manually searching old downloads, conversations, and photos.
Before sending a file, verify that the recipient is an official store, manufacturer, or service channel. Share only the information needed for the request, and keep the case number, contact date, and instructions you receive.
6. Keep expired records as useful history
After coverage ends, the record can remain available under Expired. It may still help you identify when and where an item was purchased, retrieve its receipt, or connect later maintenance with the same asset.
An expired warranty does not necessarily mean the receipt has no value. Purchase documents may still matter for insurance, personal inventory, resale, or proof of ownership.
A complete example
For an appliance purchased on November 10 with 12 months of coverage:
- photograph the receipt on the purchase date;
- create a warranty using the correct name, model, and date;
- enter the 12-month duration and attach the receipt;
- confirm that the item appears under Active;
- monitor remaining days and Expiring soon;
- test the appliance before the deadline;
- use View receipt directly from the record if support is needed;
- keep it under Expired as part of the asset history.
Mistakes that make records less useful
- generic names such as
TVorPhone; - cropped or unreadable images;
- dates entered without checking the document;
- coverage extensions that are never updated;
- receipts stored without a corresponding deadline;
- records deleted immediately after coverage ends even when the document remains relevant.
With this workflow, Remember becomes a practical reference center: it shows what is still covered, highlights what expires soon, and keeps every receipt connected to the correct product.